The Science of Perfecting Home-Fermented Hot Sauces and Condiments

Let’s be honest. That bottle of store-bought hot sauce is fine. But it’s predictable. It lacks… soul. What if you could create something alive, complex, and uniquely yours? That’s the magic—and science—of fermentation. It’s not just preserving peppers; it’s conducting a symphony of microbes to build flavor you simply can’t buy.
Here’s the deal: fermenting at home might seem like a mysterious art. But at its core, it’s a beautifully predictable biological process. Once you understand the basic science, you move from following recipes to creating them. You stop worrying about “Is this mold?” and start playing with flavors confidently. Let’s dive in.
The Tiny Ecosystem in Your Jar: Lacto-Fermentation 101
All great fermented hot sauces start with one key process: lacto-fermentation. The name sounds technical, but it’s beautifully simple. Naturally occurring Lactobacillus bacteria—they’re everywhere on fresh vegetables—convert sugars into lactic acid.
This acid does two incredible things. First, it acts as a natural preservative, creating an environment where harmful bugs can’t survive. Second, and more importantly, it creates that signature tangy, deep, umami-rich flavor profile. Think of it as the difference between a raw cabbage leaf and a crisp, funky sauerkraut. Same ingredient, transformed by biology.
The Non-Negotiables for Fermentation Success
To keep your microbial friends happy and your condiments safe, you’ve got to get a few things right. Honestly, it’s mostly about setting the stage and then getting out of the way.
- Salt: Not just any salt. Use non-iodized salt (like sea salt or pickling salt). Iodine can inhibit fermentation. The salt concentration is crucial—it creates a selective environment where lactobacilli thrive, but spoilage organisms don’t. A 2-5% brine (by weight of the water) is the typical sweet spot.
- Anaerobic Environment: Lactobacillus prefers life without oxygen. Submerging your veggies under the brine is the single most important step. Weights or clever jar-top tricks are your best friends here. Oxygen leads to mold, and well, that’s a recipe for disappointment.
- Time & Temperature: Fermentation is a slow dance. A warm spot (68-75°F is ideal) gets things bubbling faster, but cooler temps (even in a basement) develop more nuanced, complex flavors over a longer period. Taste is your guide—usually 1-4 weeks does the trick.
Building Your Flavor Foundation: Beyond the Heat
Sure, you can just ferment peppers and call it a day. But the real artistry—the part that feels like alchemy—comes from your aromatics. This is where you build layers.
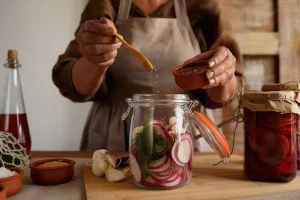
Garlic and onions are classic starters, fermenting into something mellow and sweet. But don’t stop there. Try adding whole spices like coriander seeds or black peppercorns. A piece of kombu seaweed can boost umami. Even fruits like mango or pineapple can be fermented alongside peppers for a sweet-tangy-finish. The microbes will work on all of it, blending the flavors into something cohesive and utterly unique.
| Ingredient Category | Examples | Flavor Contribution |
| Base Peppers | Jalapeño, Habanero, Fresno, Serrano | Heat level, fruitiness, vegetal notes |
| Aromatics | Garlic, Shallot, Ginger, Leek | Pungent depth, savory foundation |
| Flavor Enhancers | Carrot, Beet, Roasted Tomato | Sweetness, earthiness, body |
| Spices & Herbs | Mustard Seed, Dill, Cilantro Stems | High notes, complexity, fragrance |
The Post-Ferment Power Move: Blending and Balancing
Once fermentation is to your liking, the fun isn’t over. In fact, this is where many home fermenters miss a huge opportunity. You’ve created this incredible fermented mash… now what?
Blending is key. And the liquid you choose to blend with changes everything. Using some of the fermentation brine is the classic move—it preserves the probiotic benefits and that tangy punch. But you could also use vinegar (apple cider vinegar is a favorite) for a sharper finish, or even a bit of citrus juice for brightness.
This stage is also your chance to correct course. Too fiery? Add a roasted carrot or a touch of sweet fruit. Too flat? A splash of vinegar or a pinch of salt can wake it right up. Think of it like editing a draft—you’re polishing the final product.
Troubleshooting: Reading the Signs in Your Ferment
This is where confidence comes in. Fermentation can look… weird. Kahm yeast, a harmless white film, is common and can just be skimmed off. But fuzzy, colorful mold? That means oxygen got in, and you should toss the batch. The smell should be tangy, pickly, and pleasantly sour—not putrid or rotten.
Bubbles are a great sign! They mean your lactobacilli are active and happy. A slight cloudiness in the brine is also totally normal. It’s the microbial workforce doing its job.
The Final Jar: Safety, Storage, and Enjoyment
After blending, you’ll bottle your sauce. For long-term shelf stability, especially if you added fresh ingredients post-ferment, pasteurizing (heating to 160°F) is a safe bet. But it will kill the live probiotics. Many folks, myself included, often skip this for smaller batches kept in the fridge—the acidity usually keeps things safe for months.
Label your creations. Note the peppers used and the date. Because the best part, after all this science, is the sharing. Drizzle your fermented hot sauce on eggs, stir it into mayo for a killer spread, or marinate meats with it. It’s a living ingredient.
In the end, perfecting home-fermented condiments is less about rigid rules and more about guided exploration. You’re not just making a spicy topping. You’re tapping into an ancient, slow food tradition. You’re collaborating with invisible life to transform the ordinary into the extraordinary. Each bubbly, tangy, fiery batch is a tiny experiment—a delicious reminder that sometimes, the best flavors come from letting go, and letting nature do its thing.